Kuva1: Sidontalanka kiinnitetään koukulle. Itse olen suosinut uni big fly lankaa sen vahvuuden vuoksi. Koukkuna minulla on tässä Kamasanin B175 koukkuja koossa #4. Koukun kokoa voi vaihdella halutun perhon koon mukaan.
Kuva2: Pyöritetään siiman ympärille ice wingiä ja dubataan se koukun takaosaan kiinni.
Kuva3: Dubbauksen jälkeen pitäisi näyttää tältä tai teillä näyttää varmasti hieman paremmalta.
Kuva4: Otetaan nippu craft furia. Kannattaa kokeilla kaikkia eri värejä. Pinkki on toiminut, kun taas keväällä keltainen on ollu kova sana.
Kuva5: Sidotaan crafti nippu väärinpäin koukulle tiukasti.
Kuva6: Tästä oli hyvin vaikea saada selkeää kuvaa, mutta tarkoitus on käsin hapsutella craftia taaksepäin koukulla niin, että se tulisi tasaisesti ympäri koukkua.
Kuva7: Sidotaan karva taaksepäin, niin että ei sidota karvan päältä vaan edestä jolloin lopputuloksesta tulee "ilmavampi". Sidotaan vielä toinen ja kolmaskin nippu tarvittaessa samalla tyylillä.
Kuva8: Seuraavaksi otetaan nippu mustaa craftia.
Kuva9: Sidotaan musta nippu samanlaisti väärinpäin koukulle. Tällä kertaa ei kuitenkaan hapsuteta karvaa ympäri koukka vaan käännetään suoraan taakse.
Kuva10: Näin saadaan perholle musta selkä. Tässä vaiheessa voi tehdä jo lopetussolmut päähän.
Kuva11: Itse olen vielä sidoksen solmut ja pään vahvistanut kyseisellä liimalla.
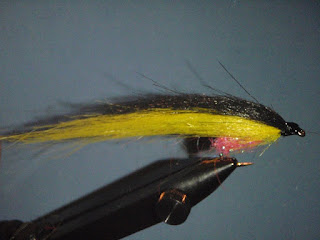
Kuva12: Valmiin perhon pitäisi näyttää jokseenkin tältä. hieman voi vielä siistiä saksien kanssa.
Toivottavasti kuvasarja hieman auttoi teitä.
Alla on nyt muutamia valmistuneita perhoja joskaan kaikkia en jaksanut kuvata.
Fly for asp
I now thought to put here a little series of pics of the flies I promised to show earlier. Craft fur is the material most of these are made of. The reason why I use it is that it is easy to work with, lively-looking in the water and lightweight to cast. These flies can by all means be modified if you want to, for instance by adding glitters and other materials. In the next set of pics, I have for example dubbed little pink ice wing to the tail. The set is not very descriptive, but I hope you catch the drift. After all, these flies are very quick and easy to make.
Pic1: Catch the tying thread onto the hook shank. I prefer uni big fly- yarn because of its strength. As a hook I have here Kamasan B175 hooks, size #4. You can change the size in case you want a fly of different size.
Pic2: Dub the ice wing onto the thread and wind it to the tail end of the hook.
Pic3: After dubbing the fly should look like this. Although you guys have certainly better looking flies than I have.
Pic4: Take a bunch of craft fur. It’s worth trying all different colors. Pink has worked well, whereas in spring the yellow one works great.
Pic 5: Tie the bunch of craft backwards onto the hook shank. Make it tight.
Pic6: This one is extremely difficult to get a clear picture of, but in this phase you are supposed to tease craft with your hands backward, so it would evenly settle around the hook.
Pic7: Tie the fur backwards. Do not tie on the fur, but in front of it, so that the result looks fluffier. Then tie another and maybe even third bunch of fur the same way, if the fly looks like it could use a little more fur.
Pic8: Next take a bunch of black craft fur.
Pic9: Tie the black bunch backwards onto the hook shank, just like the yellow one. This time only do not tease the fur but turn it straight back.
Pic10: This is how you get a nice black back for your fly. At this point, you can already make end knots to the head of the fly.
Pic11: I have then strengthened knots and head with glue.
Pic12: The finished fly should look somewhat like this. You can tidy it up with scissors if you like.
Hopefully this set helped you guys.
Below you can see some finished flies, although I didn’t have enough patience to take a pic of them all.


Hyvät selkeät ohjeet ja näti suti.
VastaaPoistaNäitä vaihe vaiheelta perhoja pitäisi itsekin jaksaa laittaa omaan blogiin.
Lisää näitä :)
-Djuza-
Tutun näkösiä suteja, samantyylistä on itsekin tullut väsättyä. Jos niitä sitten vilauttelis tinseleiden lisäksi huomenna toutareille.
VastaaPoistaKiva muuten saada vähän tämmöstä erikoistuneempaakin blogia tänne nettimaailmaan, hyvältä näyttää!
Hieno juttu, että saatiin toutaimelle oma blogi. Keep up the good work!
VastaaPoista